The Teacher Dashboard is where you run a class that uses QuickBooks Online Step-by-Step. Your students read the book and do the exercises online. You see how far each one has got, what they scored, and what is waiting on you. When you're signed in, open it from Teacher Dashboard at the top of any page.
What it does for you
- Gets students in. Share your join code, email invitations, or create accounts yourself.
- Grades the work. Quizzes and exams score themselves. The smart grader checks the QuickBooks reports students upload.
- Shows who is falling behind. Reading, quizzes, exams and smart-graded work, for every student and every chapter.
- Collects what needs a person. Student questions and messages, written answers, held grades and uploads that could not be read land in one list.
- Hands you the teaching materials. The Instructor's Manual, slide decks and the QuickBooks files your class works from.
What is on the screen
Each class has its own page. Most of your time is spent in its three tabs.
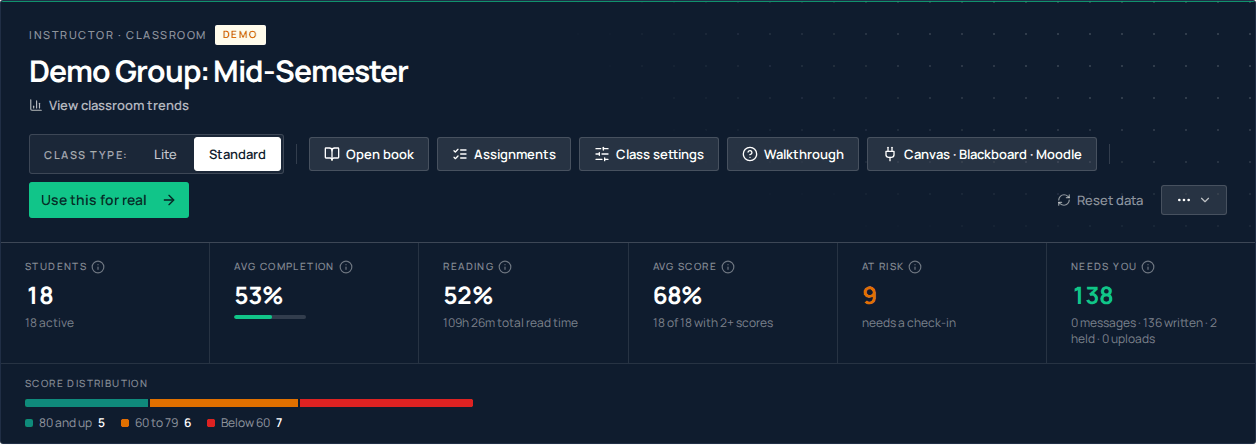
| Part | What it is for |
|---|---|
| Class type | Switch the whole class between Lite and Standard in one click. New classes start on Standard. |
| Open book | Opens the book your students read. |
| Needs you tab | Everything waiting on you. Clear it and you are up to date. |
| By student tab | Your roster, one row per student. Click a name to see their full record, message them, or change a grade. |
| By chapter tab | One card per chapter, showing how the whole class did on it. |
| View classroom trends | Charts of progress and activity over the term. The link sits under the class name. |
| Assignments | Pick which chapters your class works on. |
| Class settings | One sheet for the whole class: smart grading and AI help on or off, quiz and exam rules, how much of the answer key students see, and which reader they use. |
| Walkthrough | A short tour of the class page. Run it again any time. |
| Canvas · Blackboard · Moodle | Download your grades as a file for your school's system. |
| Invite students | Email invitations, paste a whole class list, or create accounts. |
| Invite teacher | Invite a colleague to teach the class with you. They get the same class page and can message your students; a student's message reaches you both. |
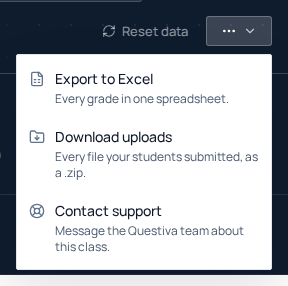
| More options (the three dots) | Export to Excel for a spreadsheet of grades, Download uploads for every file your students submitted, and Contact support to message us about the class. |
The left sidebar has New classroom, All classrooms, your Seats, Branding (once you are approved), your classes, and your teaching resources: the Instructor's Manual, Instructor resources, and the Canvas, Moodle & LTI page.
What your students see
Students read the book, take each chapter's practice quiz and exam, and upload QuickBooks reports for the smart grader. If they select text in the reader, Ask instructor sends you a question with the page attached. Report problem goes to us and the book's author, not to you.
Where to start
Try the demo class
It opens in the book first, so you see what your students see. A slim bar at the foot of the page guides you, and you can scroll and click anywhere above it. Then it walks you through a dashboard already full of sample students and weeks of work. See Try the demo classroom.
Create your class
Choose New classroom in the sidebar, then Real classroom. If it has a padlock, it asks who you are setting it up for first (free, instant, no review). Or turn the demo into your real class. See Create a class.
Get your students in
See Invite students.
Request instructor approval
You don't need it to run a class. It opens the Instructor's Manual, the teaching files, the answer keys and an evaluation copy of the book. It's free, and a person reviews it, usually within one business day. See How instructor approval works.
After that, a normal week is short: open the class, clear Needs you, and check By student for anyone marked At risk.